

Artificial intelligence is changing the way people work, manage businesses, and complete everyday tasks. Many activities that once required hours of manual effort can now be handled with automated workflows. But AI is becoming more useful than simply answering questions or generating text. With the help of AI agents, businesses can create systems that understand requests, access information, and perform specific actions.
One platform that makes this possible is n8n. It allows users to connect different applications, APIs, databases, and AI models through visual workflows. You do not need to be an experienced software developer to start learning it. A beginner can build useful automation projects by understanding how individual workflow components work together.
In this guide, we will explore how AI agents work, how to get started with n8n, and how to build two practical projects. The first project will be an AI-powered book inventory assistant that can search and update stock information. The second will be a website uptime monitoring system that checks whether a website is responding correctly.
These projects are useful learning examples for students, freelancers, small business owners, and anyone interested in AI automation. They can also help you understand the type of practical solutions that businesses may need.
What Is an AI Agent?
An AI agent is a software system that uses an AI model to understand information, make decisions within defined instructions, and interact with connected tools. Instead of only returning a written answer, an agent can sometimes take action using the applications and permissions provided to it.
For example, imagine that you manage a small bookstore. You receive messages such as:
- How many copies of this book are currently available?
- Which books are running low on stock?
- Update the quantity of a particular book to 100.
- Find the book with the lowest inventory.
Without an automated system, you might need to open your spreadsheet, search for each book, check its quantity, and update the information manually. An AI-powered inventory assistant can help perform these tasks through a simple chat interface when it has been properly connected to your database and given the correct permissions.
The important point is that an AI agent does not automatically have access to every application or business system. You must connect the required tools, configure their permissions, and provide clear instructions about what the agent is allowed to do.
Automation vs. AI Agents: What Is the Difference?
Automation and AI agents are related, but they are not exactly the same. Understanding the difference will help you decide which approach is suitable for a particular task.
Traditional Automation
Traditional automation follows predefined instructions. It performs an action when a specific trigger or condition occurs. The workflow usually follows a predictable path.
For example, suppose you create an automatic email reply for your business. Whenever someone sends an email, the system sends the same prepared message. It does not need to understand the meaning of the email. It simply follows the rule you created.
A basic traditional automation might look like this:
Trigger → Action → Result
- Trigger: A customer submits a form.
- Action: Send an automatic confirmation email.
- Result: The customer receives a confirmation message.
AI-Powered Automation
An AI agent can work with information that is less predictable. It can interpret a request, select an available tool, and use the result to continue a task according to its instructions.
Imagine that a customer sends a message to your online store asking about a product. An AI agent could identify the product name, search the connected inventory database, and prepare an answer based on the available stock information.
In a more advanced setup, the agent might also route a request to the appropriate department. However, important actions such as refunds, payments, deleting records, or changing sensitive information should have suitable approval steps.
In simple terms, traditional automation follows fixed rules, while an AI agent can interpret requests and choose between connected tools within the limits you configure.
Why Use n8n to Build AI Agents?
n8n is a workflow automation platform that connects different services and applications. It provides a visual editor where you can add nodes, connect them, and define how information moves through a workflow.
Each node performs a particular function. One node might receive a message, another might send information to an AI model, and another might update a database. Connecting these nodes creates a complete workflow.
There are several reasons beginners and experienced automation builders may find n8n useful:
- Visual workflow editor: You can understand the structure of a workflow by looking at connected nodes.
- Application integrations: Workflows can connect with supported services, APIs, databases, and communication tools.
- AI capabilities: AI-related nodes can connect language models with tools and other workflow components.
- Flexible hosting: You can use n8n Cloud or explore self-hosting options if you have the technical knowledge and suitable infrastructure.
- Practical business uses: It can support tasks such as lead management, notifications, reporting, data processing, and inventory workflows.
Another platform you may encounter is Make.com. It is also used for visual workflow automation. Both platforms have different interfaces, integrations, pricing structures, and features. The right choice depends on your project, technical comfort, and budget.
For this tutorial, we will use n8n because its visual workflow approach is suitable for demonstrating how an AI agent connects with external tools.
Tools You Need Before Starting
Before building your first AI agent, prepare the services that will connect your workflow. You do not need to install every tool on your computer. Most of the setup can be completed through a web browser.
1. n8n – The Main Automation Platform
Website: n8n.io
n8n will be the central platform for our projects. It is where we create workflows, add AI agent nodes, connect databases, and configure actions. You can explore its hosted service or review its self-hosting documentation before choosing an installation method.
2. Groq Console – An AI Model Option
Website: console.groq.com
Groq provides access to supported language models through an API. You can create an account, check the currently available models, and generate an API key if your account is eligible. Its free access and usage limits can change, so always review the current conditions.
3. OpenAI Platform – Another AI Model Option
Website: platform.openai.com
You can also connect an OpenAI model to an n8n workflow using an API key. The OpenAI API is a separate service from a ChatGPT subscription, and API usage may create additional charges. Check the available models, pricing, and billing requirements before using it.
4. Airtable – Your Database
Website: airtable.com
Airtable is a database and collaboration platform that lets you organize information into tables. For our bookstore project, we will use it to store book names, stock quantities, and minimum stock levels.
5. Hostinger – An Optional VPS Hosting Provider
Website: hostinger.com
If you want to explore self-hosting n8n, a VPS may be one option. A VPS gives you more control over the server environment, but you also become responsible for updates, backups, security, and maintenance. Hosting is not required if you use an available hosted n8n plan.
How to Create Your First n8n Workflow
Once your account is ready, you can start with a basic workflow. The exact names and positions of buttons may change as the n8n interface is updated, but the general process remains similar.
- Visit the official n8n website.
- Create an account or sign in to your existing account.
- Open the workflow dashboard.
- Select the option to create a new workflow.
- Give your workflow a clear name, such as “My First AI Chat Agent”.
A workflow is the place where you connect the components required for your automation. Think of it as a visual map that shows what happens when a user sends a request.
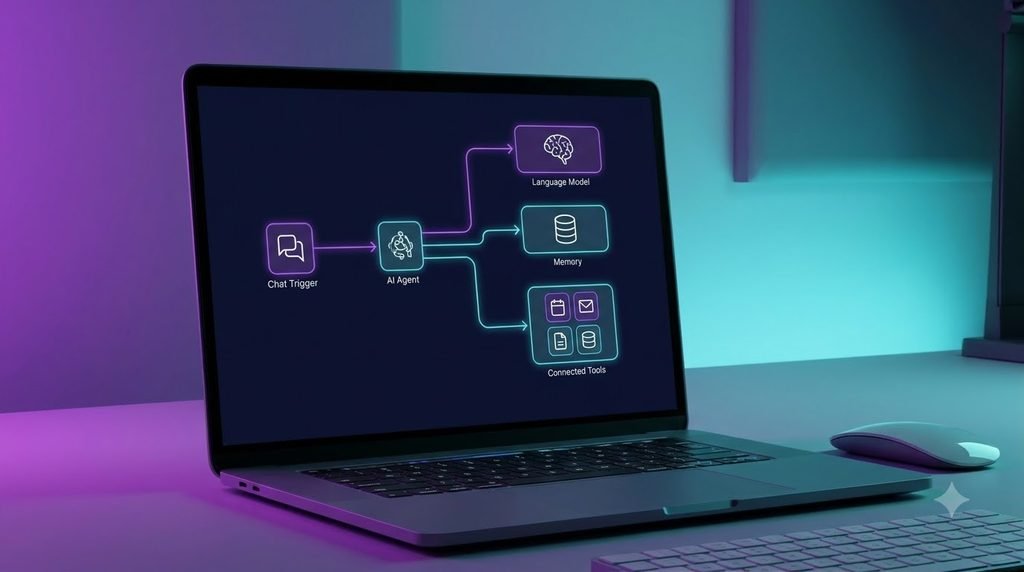
Step 1: Add a Chat Trigger
Search for the chat trigger available in your n8n version. In some versions or configurations, it may appear as an option such as When chat message received or a similar chat-trigger node.
A trigger tells the workflow when to start. For a chat-based AI assistant, the trigger receives the message entered by the user.
For example, a user might type:
What is an AI agent, and how can it help my business?
The chat trigger receives this message and passes the information to the next connected node.
Step 2: Add the AI Agent Node
Next, add an AI Agent node to your workflow and connect it to the chat trigger. This component coordinates the AI model and any tools that you make available.
You can think of it as the decision-making part of the workflow. It receives a request, interprets the instructions, and determines how to respond or which connected tool may be useful.
However, the agent needs an AI model before it can generate responses. It may also need access to tools if you want it to perform actions outside the conversation.
Step 3: Connect an AI Model
Connect a supported language model to the AI Agent node. Depending on the integration and model you choose, you may be able to use an OpenAI model or a model available through Groq.
To connect an API service, you generally need to:
- Sign in to the provider’s official platform.
- Open its API key or developer settings.
- Create a new API key.
- Copy the key and add it to the appropriate n8n credential configuration.
- Select the supported model you want to use.
- Test the connection with a simple request.
Security reminder: Treat API keys like passwords. Do not publish them in articles, screenshots, public code repositories, or shared workflow exports. Store them in the platform’s credential manager whenever possible. If a key is exposed, revoke it and create a replacement.
Step 4: Give Your Agent Clear Instructions
An AI agent works better when its instructions explain its role, purpose, limitations, and expected response style.
For example, if you are creating a general business assistant, you could use instructions like these:
You are a helpful business automation assistant. Understand the user’s request, provide clear answers, and use connected tools only when they are relevant. Do not invent database information. If required information is missing, ask a question instead of guessing. Never perform a sensitive action without the required confirmation.
These instructions help establish the agent’s responsibilities. For more reliable results, also configure the individual tools carefully. A good system prompt cannot replace proper permissions, validation, and testing.
Step 5: Add Memory to the Agent
Some AI agent workflows support a memory component, such as Simple Memory. Memory can help an assistant use earlier messages from the same conversation when preparing a response.
For example, a user might first explain that they manage a bookstore. A few messages later, they might ask which books are running low. Conversation memory can help preserve relevant context, depending on how the workflow is configured.
A context window setting controls how much previous conversation information is made available. A value such as five may be useful for a small demonstration, but the appropriate setting depends on your workflow and memory requirements.
Remember that conversation memory is not the same as a permanent business database. Important inventory records should be stored in Airtable or another suitable data system rather than relying on chat memory.
Test Your First Chat Agent
Before moving to a larger project, send a few simple questions through the chat interface. Check whether the model responds correctly, whether the workflow runs without errors, and whether the output is easy to understand.
If the agent does not respond, check your trigger, model connection, credentials, and workflow configuration. Fixing these basic issues early will make the next projects easier.

Project 1: Build an AI Bookstore Inventory Management Agent
Now that you understand the basic structure of an AI agent, let’s create something more practical. Our first project is an AI-powered bookstore inventory assistant.
Imagine that you own a small bookstore. You have dozens or hundreds of books, and each book has a different stock quantity. Every time a new shipment arrives or a customer purchases a book, the inventory needs to be updated.
Managing everything manually can become time-consuming. An AI inventory assistant can make it easier to search for books and update stock through natural-language requests.
What Will This Agent Do?
Our example assistant will support tasks such as:
- Searching for a book by its name.
- Checking the current stock quantity.
- Identifying books with low inventory.
- Updating the quantity of a selected book.
- Returning a clear confirmation after a successful update.
For example, instead of opening a database and searching manually, you could enter a message like:
Find the current quantity of Founder Book.
The agent can use its connected search tool to retrieve the relevant record and provide the result.
Step 1: Create an Airtable Account
Visit Airtable’s official website and create an account if you do not already have one. After signing in, create a new base for your bookstore inventory.
A base is a workspace that contains tables and records. For this project, create a table called Book Inventory.
You can use Airtable’s available building or AI-assisted features to help organize the table, but review the fields yourself before using the database.
Step 2: Create the Inventory Fields
Add the following fields to your table:
- Book Name: The name of each book.
- Quantity: The number of copies currently available.
- Minimum Quantity: The stock level at which the book should be considered low.
- Category: The type of book, such as education, business, or fiction.
You can also add a supplier name, last updated date, or other useful fields. For a beginner project, start with the basic information first.
Here is an example of how your inventory might look:
| Book Name | Quantity | Minimum Quantity | Category |
|---|---|---|---|
| Founder Book | 45 | 10 | Business |
| Learn English | 8 | 15 | Education |
| Digital Marketing Guide | 25 | 5 | Marketing |
These are sample records for demonstration. You can replace them with your own inventory information.
Step 3: Generate an Airtable API Token
To allow n8n to communicate with Airtable, you need to configure an authorized connection. Airtable provides a developer platform where you can create personal access tokens with selected permissions.
Open Airtable’s developer settings and create a token for your project. Give it only the permissions needed for the tasks you want to perform. For example, searching records requires read access, while updating quantities requires the appropriate write access.
Make sure the token has access to the correct base. Copy the token and store it securely in n8n’s credential settings. Do not paste it into a public document or expose it in a tutorial screenshot.
Using limited permissions is important. If your AI agent only needs to read and update inventory quantities, it should not receive unnecessary access to unrelated business information.
Step 4: Connect Airtable to n8n
Return to your n8n workflow and open the AI Agent configuration. Add the Airtable integration as a tool if it is supported by your installed version.
Configure the Airtable credentials using the token you created. Select the correct base and the Book Inventory table.
At this stage, the agent should be able to use Airtable tools when a request requires inventory information.
Step 5: Add a Search Records Tool
The first tool should allow the agent to search the inventory table. Look for the Airtable operation that retrieves or searches records. Its exact name and configuration may vary depending on the n8n version.
Configure the tool so it can find records using the book name or another suitable field. Make sure the agent can identify the correct result before responding.
For example, when a user asks, “How many copies of Founder Book are available?”, the agent should search the Book Inventory table and retrieve the quantity from the matching record.
If multiple books have similar names, the agent should not choose one randomly. It should ask the user to clarify which record they mean.
Step 6: Add an Update Record Tool
Next, add an Airtable update operation. This tool allows the workflow to change information in an existing inventory record.
For example, a user might request:
Update Founder Book quantity to 100.
The agent needs to identify the correct book record and provide the correct record identifier and new quantity to the update operation.
Some n8n AI tool configurations support expressions such as $fromAI() to let the AI provide selected tool parameters. The exact syntax and supported fields depend on the node and version you are using. Follow the current n8n documentation when configuring these parameters.
Important: Do not allow an AI-generated book name or record ID to update an arbitrary record without validation. First search for the book, confirm that there is one clear match, validate that the quantity is a valid number, and consider asking for confirmation before changing the database.
Step 7: Give the Agent Inventory Instructions
The agent should have clear instructions explaining how to use the search and update tools. For example:
You are a bookstore inventory assistant. Use the inventory search tool to find book records. When a user asks about stock, report the quantity from the database. When asked to update stock, first identify the exact book record. If there are multiple matches or the book cannot be found, ask for clarification. Validate that the new quantity is a non-negative whole number. Do not claim that an update succeeded until the database confirms it.
Step 8: Test the Inventory Assistant
Try several test messages before using the workflow with real inventory:
- “Find Founder Book in the inventory.”
- “How many copies of Learn English are available?”
- “Which books are below their minimum quantity?”
- “Update Founder Book quantity to 100.”
- “Find a book that does not exist.”
Check the database after every update test. Make sure the correct record changes and that the assistant reports errors honestly.
For a real business, consider adding a confirmation step, an activity log, and restricted access for different employees. This helps prevent accidental changes and makes it easier to review what happened.
You now have the basic design of an AI inventory assistant. The same approach can be adapted for other small businesses, such as clothing shops, stationery stores, warehouses, and online retailers.

Project 2: Build a Website Uptime Monitoring System
Our second project solves a different problem. Websites sometimes become unavailable because of server problems, hosting issues, configuration errors, or other technical difficulties. If you manage a website for yourself or a client, discovering downtime quickly can be important.
A website uptime monitor checks whether a website is responding to requests. It can run automatically on a schedule and send an alert when the website appears to be unavailable.
Unlike the inventory assistant, this project does not need an AI model to make its main decision. It uses traditional automation: a schedule trigger, an HTTP request, and a condition that checks the response.
What Will the Workflow Do?
The basic workflow will follow this structure:
Schedule Trigger → HTTP Request → IF Node → Notification
- Schedule Trigger: Starts the workflow at a selected interval.
- HTTP Request: Sends a request to the website you want to monitor.
- IF Node: Checks the response or status code against your chosen condition.
- Notification: Sends an alert if the website appears to be unavailable.
Step 1: Create a New Workflow
Open your n8n dashboard and create another workflow. Give it a name such as Website Uptime Monitor.
Start by adding a Schedule Trigger node. This node allows the workflow to run automatically at selected times instead of waiting for someone to send a chat message.
Step 2: Configure the Schedule Trigger
Choose an interval that makes sense for your website and hosting environment. For a beginner demonstration, you can run a manual test or use a reasonable schedule such as every five or ten minutes.
Although very frequent checks may sound useful, checking every website every minute is not always necessary. It can create additional requests, consume resources, and potentially conflict with service limits. Choose a monitoring interval based on the importance of the website and the provider’s acceptable-use requirements.
Step 3: Add an HTTP Request Node
After the schedule trigger, add an HTTP Request node and connect it to the trigger.
Enter the website address you want to monitor, including the correct protocol, such as HTTPS. Configure the request method and other settings according to the website and the purpose of your test.
For example, you might monitor:
https://example.com
Replace this sample address with a website you own or have permission to monitor. Run a test and inspect the response returned by the HTTP Request node.
Step 4: Understand HTTP Status Codes
HTTP status codes help explain how a server responded to a request. One commonly recognized code is 200 OK, which generally means that the request was successful.
However, a status code of 200 does not guarantee that every part of a website is working correctly. A page could load while an important feature, checkout process, or database connection is broken.
Other responses may indicate redirects, client errors, or server errors. Your monitoring workflow should account for the type of response that is meaningful for the website you are checking.
Step 5: Add an IF Node
Connect an IF node after the HTTP Request node. This node evaluates a condition and directs the workflow down the matching path.
For a basic demonstration, configure a condition that checks whether the returned status code equals 200.
- True path: The response matches the selected success condition.
- False path: The response does not match the selected condition, or the request may have failed.
Be aware that some HTTP Request configurations treat unsuccessful HTTP responses as errors rather than passing them normally to the IF node. Review the node’s error-handling settings and test both successful and unsuccessful cases. You may need an error-handling path to catch connection failures and timeouts.
Step 6: Add an Email Notification
To receive an alert when a website appears to be down, connect an email service to the appropriate failure or error-handling path.
For example, the notification could include:
- The website address being checked.
- The time of the failed check.
- The response status, if available.
- A short message asking the website owner to investigate.
Use the email integration supported by your n8n setup and configure its credentials securely. Test the notification before relying on it.
For a more reliable monitoring system, avoid sending an alert for every single failed request. Temporary network problems can cause false alarms. You can add a retry or require multiple consecutive failures before sending a notification.
Can You Host n8n on a VPS?
Yes, self-hosting is one option for people who want more control over their automation environment. A VPS from a provider such as Hostinger may be used for this purpose if the selected server plan meets the software’s requirements.
However, self-hosting is not simply a matter of buying a server and opening n8n. You may need to understand server setup, Docker or another supported installation method, environment variables, HTTPS, domain configuration, backups, and security updates.
Before choosing a VPS, consider these points:
- Server resources: Choose suitable CPU, memory, and storage for your expected workflows.
- Security: Protect the server, use strong authentication, and keep software updated.
- Backups: Back up workflow data and important configuration regularly.
- Availability: Plan how you will monitor and recover the server if it stops working.
- Maintenance: Remember that self-hosting creates ongoing technical responsibilities.
If you are completely new to automation, starting with a hosted option may be easier. You can explore self-hosting later when you understand the platform and are comfortable maintaining a server.
How Can You Use These Skills in Freelancing?
Learning n8n and AI automation can help you understand problems that businesses face every day. Many organizations use multiple applications to manage customer messages, orders, appointments, documents, and reports. Connecting these systems can reduce repetitive manual work.
After building and testing your own projects, you can create a portfolio that demonstrates what you know. For example, you could show a working inventory workflow using sample data or a website monitoring demonstration.
Potential project ideas include:
- Automatic lead collection and notification systems.
- Customer support assistants connected to approved knowledge sources.
- Inventory search and stock update workflows.
- Appointment reminders and booking notifications.
- Website monitoring and reporting systems.
- Automatic data organization and spreadsheet updates.
However, learning a tool does not guarantee clients or a particular income. Freelancing success depends on your ability to understand a client’s actual problem, build a reliable solution, communicate clearly, and provide support after delivery.
Important Security and Reliability Tips
Automation workflows can interact with important business information, so security should be part of the design from the beginning.
- Protect API keys: Never expose credentials in public tutorials, screenshots, or shared files.
- Use limited permissions: Give each integration only the access it needs.
- Test with sample data: Do not experiment on important business records without backups.
- Validate AI output: Language models can misunderstand requests or return incorrect information.
- Require confirmation: Add approval steps for sensitive or difficult-to-reverse actions.
- Monitor workflow errors: Check execution logs and create alerts for important failures.
- Respect privacy: Do not send private customer or business information to an AI provider unless you have the necessary permission and have reviewed its data policies.
Frequently Asked Questions
1. Can beginners build AI agents with n8n?
Yes. Beginners can start with simple workflows and gradually learn how triggers, AI models, tools, credentials, and databases work together. Some technical knowledge becomes useful as projects become more advanced, but you do not need a computer science degree to begin.
2. Is n8n free to use?
n8n offers different ways to use its platform, including hosted and self-hosted options. Pricing, features, and usage conditions can change. Check the official n8n website before choosing a plan. Self-hosting may avoid a hosted subscription fee, but server costs and maintenance still need to be considered.
3. Can I use Groq with n8n?
You may be able to connect supported Groq models through an available integration or compatible API configuration. Check the current n8n documentation and Groq’s model availability. Free access, where offered, may have usage limits.
4. Do I need to pay for the OpenAI API?
OpenAI API usage is separate from a ChatGPT subscription. API charges depend on the model and amount of usage, along with the current pricing and account conditions. Review the official pricing page before connecting an API key.
5. Can an AI agent update Airtable records automatically?
Yes, if you configure the correct Airtable integration, permissions, and update operation. You should also validate the selected record and the new values. For important data, use a confirmation step before making changes.
6. Is a website uptime monitor an AI agent?
Not necessarily. A workflow that checks a status code and sends an email follows predefined rules, so it is an example of traditional automation. You could add AI to summarize errors or analyze monitoring reports, but it is not required for basic uptime checking.
7. Can I sell n8n automation services to clients?
You can offer automation development as a freelance service if you have the skills to build, test, document, and maintain the workflows. Start with small projects, demonstrate your work, and agree on the scope and responsibilities with clients before building their systems.
Final Thoughts
AI agents and workflow automation are useful skills to explore in 2026. With n8n, you can connect AI models, databases, and other applications to build systems that help with real business tasks.
In this guide, we covered the difference between traditional automation and AI agents, created the basic structure of an AI chat assistant, and explored two practical projects: a bookstore inventory management agent and a website uptime monitoring workflow.
You do not need to build a complicated system on your first day. Start with a small workflow, understand each node, test it with sample information, and improve it step by step. As your experience grows, you can combine more tools and create solutions for different business needs.
The most important skill is not simply connecting applications. It is learning how to identify a problem and build a safe, useful, and reliable solution around it.