How to Automate YouTube Uploads with AI: A Complete Guide
Uploading videos to YouTube involves more than selecting a file and clicking the publish button. Creators often need to write an engaging title, prepare a detailed description, select relevant tags, create a thumbnail, and configure the video’s publishing settings. When you publish regularly, these repetitive tasks can consume valuable time that could otherwise be spent planning and producing better content.
YouTube upload automation offers a practical way to simplify this workflow. By combining an AI assistant, a local development environment, audio transcription, and the YouTube Data API, you can build a system that prepares video metadata and uploads videos with less manual effort. You do not necessarily need advanced programming knowledge to begin, although you should understand the permissions and settings involved.
This guide explains how to approach AI-powered YouTube automation using tools such as Claude, Visual Studio Code (VS Code), Google Cloud Console, and the YouTube Data API. You will learn how the workflow operates, how to configure the required services, and how to test the system safely before relying on it for regular uploads.
What Is YouTube Upload Automation?
YouTube upload automation is a process that uses software to handle some or all of the repetitive steps involved in publishing a video. Instead of manually preparing every field, you can configure a program to process files, extract information from their audio, generate metadata, and send the video to your selected YouTube channel through an authorized API connection.
For example, imagine that you create three educational videos each week. You could place each finished video in a designated folder. Your automation program could transcribe the audio, use an AI model to suggest a title and description, prepare relevant tags, and upload the file after the required checks are completed.
The important distinction is that automation handles repetitive operations, while you remain responsible for accuracy, originality, privacy, and the final publishing decision.
Tools Required for an AI YouTube Uploader
- Claude: An AI assistant that can help plan a project, write code, explain errors, and implement features when used with an appropriate coding environment.
- Visual Studio Code: A code editor where you can organize project files, run commands, inspect application output, and troubleshoot problems.
- Python: A programming language suitable for building scripts that process files, communicate with APIs, and automate repetitive tasks.
- Audio transcription software: A speech-to-text tool that converts spoken words into text for further analysis.
- An AI text-generation API: A service that can turn a transcript into a relevant title, description, and set of suggested tags.
- Google Cloud Console: The platform used to configure a Google Cloud project and enable the required YouTube API.
- YouTube Data API: The interface that allows an authorized application to perform supported operations on a YouTube account.
You may need to install Python, Git, or other dependencies depending on your computer and the application you build. Requirements vary, so check the documentation for your chosen tools before installing additional software.
How the Automated Workflow Works
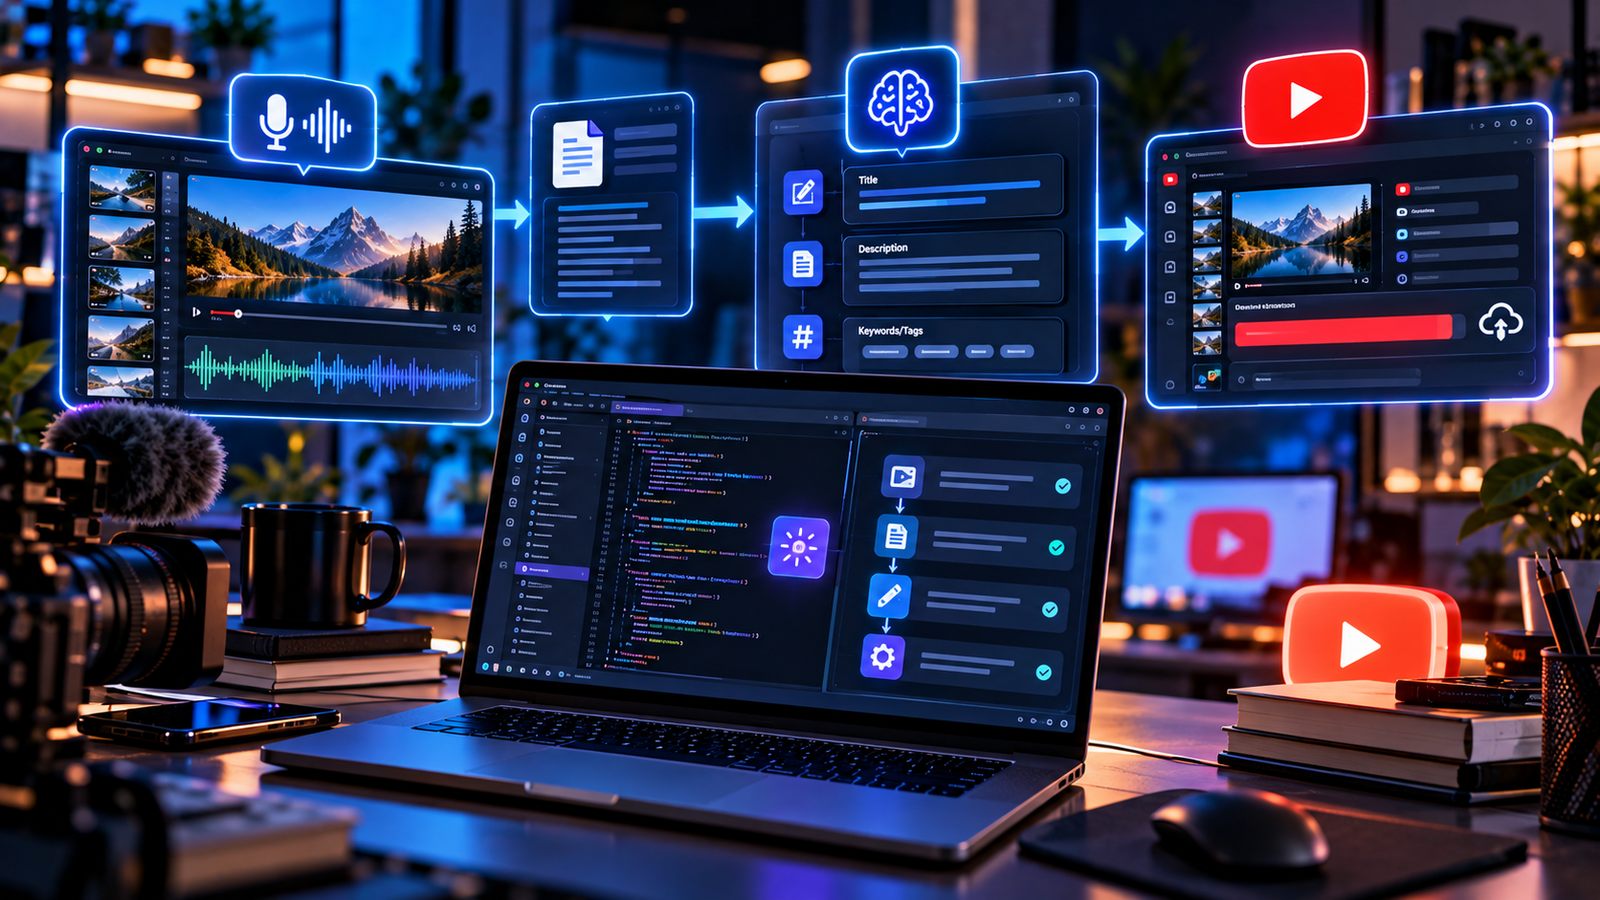
A useful system follows a clear sequence rather than attempting to publish a video without checks. First, it identifies a video file in an input folder. Next, it extracts the audio or processes an existing audio file and converts the speech into a transcript. The AI model uses that transcript to understand the subject and prepare relevant metadata.
The program then validates the generated information, checks the selected channel and publishing settings, and uploads the video through the YouTube Data API. After uploading, it records the result so you can locate the video and investigate any errors.
- Input: Select the video and optional thumbnail.
- Transcription: Convert spoken audio into readable text.
- Metadata generation: Create a title, description, and relevant tags.
- Review: Check accuracy, links, permissions, and video settings.
- Upload: Send the video to the intended YouTube channel.
- Verification: Save the video ID or URL and check the upload result.

Step 1: Create a Google Cloud Project
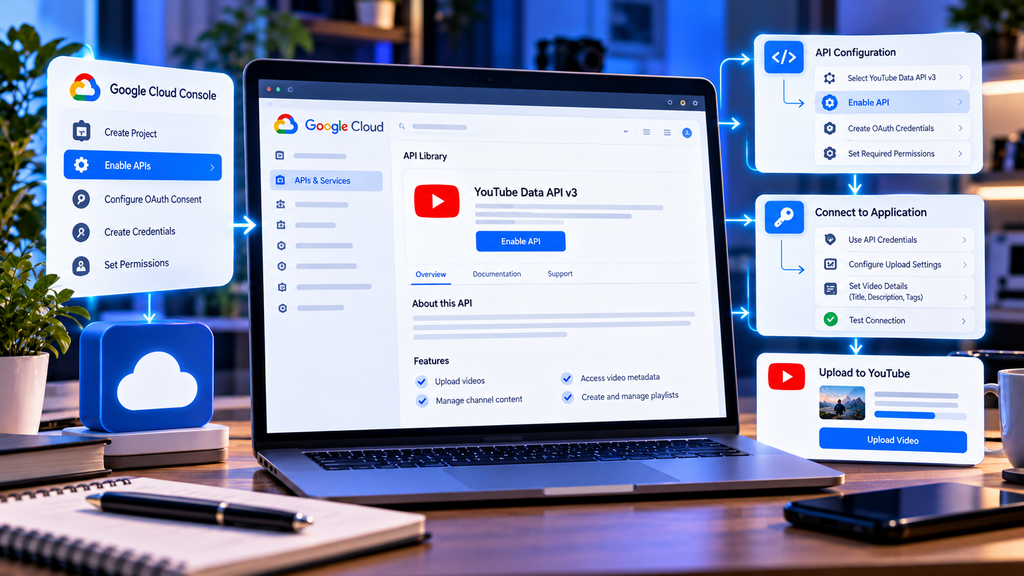
To let your application communicate with YouTube, you need to configure a Google Cloud project. Open the Google Cloud Console and sign in with the Google account you intend to use for the project.
- Create a new project or select an existing project dedicated to your automation application.
- Open the API library and search for the YouTube Data API v3.
- Open its details and enable the API for your project.
- Review the API’s documentation and quota limits before building your uploader.
Using a dedicated project can make configuration and troubleshooting easier. The project should have only the APIs and permissions needed for your intended workflow.
Step 2: Configure OAuth Consent and Credentials
An application that uploads videos to a YouTube channel generally needs authorization from the channel owner. OAuth 2.0 allows the application to request specific permissions without requiring your Google password to be stored in your program.
In Google Cloud Console, configure the OAuth consent screen or Google Auth Platform settings as presented in your account. Provide the required application information and select the appropriate audience for your use case. The available options depend on the type of Google account and application.
Next, create an OAuth client ID. For a program that runs directly on your computer, a desktop application client is often an appropriate starting point. Download the credential configuration if required by your chosen library, and store it in a protected location within your development environment.
Follow Google’s current instructions for OAuth configuration, testing users, publishing status, and verification requirements. Publishing an OAuth application does not automatically guarantee verification or unrestricted access. Some applications and sensitive permissions may be subject to additional requirements.
Step 3: Request Only the Permissions You Need
OAuth scopes determine which operations an application can perform. A YouTube uploader should request the minimum permissions needed for its features. If the application only needs to upload videos, avoid requesting unrelated access to Gmail, Google Drive, or other services.
After configuring the required permissions, complete the authorization process using the intended Google account and channel. Review the consent screen carefully before granting access. Keep in mind that the YouTube channel selected during authorization matters: a valid connection to the wrong channel can still produce an unwanted upload.
Step 4: Protect API Keys and OAuth Credentials
Credential security is essential when building an AI uploader. An AI provider’s API key and a Google OAuth client configuration serve different purposes, so keep them separate and follow each provider’s security guidance.
- Never publish API keys, access tokens, refresh tokens, or client secrets in a public repository.
- Do not include private credentials in screenshots, tutorial videos, or shared project files.
- Use environment variables or an appropriate secrets-management method for sensitive values.
- Add local secret files to your version-control ignore rules before using Git.
- Restrict file permissions and revoke exposed credentials promptly.
For a desktop application, remember that client configuration and access tokens should still be handled carefully. Never assume that a file is safe simply because the application runs on your own computer.
Step 5: Complete the First Authorization
When you run the uploader for the first time, it may open a browser window and ask you to authorize access. Sign in to the intended account, review the requested permissions, and continue only if they match your expectations.
Some development applications may display warnings because they are in testing mode or have not completed Google’s verification process. Do not automatically dismiss these warnings. Confirm that you created the application, understand its requested permissions, and are following Google’s current requirements. An unverified application is not necessarily safe merely because you created it yourself.
After successful authorization, the program may save a token for future sessions. The exact behavior depends on the OAuth flow and library. Protect that token as carefully as other credentials, and test that the application connects to the correct channel before enabling automated publishing.
Step 6: Use Claude and VS Code to Build the Program
If you are new to programming, an AI coding assistant can help you create the initial project structure and explain how its components work. Open VS Code, create a dedicated project folder, and use Claude through a supported coding workflow to plan the application before implementing it.
Describe the result you want in clear, specific language. For example, ask for a Python application that reads videos from an input folder, transcribes their audio, generates metadata through a configurable AI provider, requests YouTube authorization, and uploads only after the necessary checks pass.
Ask the assistant to separate transcription, metadata generation, authentication, uploading, and error handling into understandable modules. This makes it easier to test individual components and identify problems without rebuilding the entire application.
AI-generated code still requires review. Check dependency installation commands, inspect changes before allowing them to run, and avoid granting an assistant unrestricted access to sensitive files or accounts. Test the program with a short sample video before processing important content.
Step 7: Transcribe the Video Audio
The transcript gives the AI model information about what the video actually contains. Depending on your chosen transcription tool, the application may extract audio from the video and process it locally or send it to an external service.
Choose a transcription method that supports the language and audio quality of your videos. Background noise, multiple speakers, technical terminology, and strong accents can affect accuracy. If the transcript contains major errors, the AI may generate a misleading title or description.
Before moving to metadata generation, check that the transcript is not empty, that the expected file was processed, and that the text broadly matches the video. If transcription fails, record the error and stop the publishing workflow rather than generating metadata from incomplete information.
Step 8: Generate SEO-Friendly YouTube Metadata
Once the transcript is ready, send the relevant text to your selected AI model with instructions for creating accurate, readable metadata. The goal is not to stuff a title or description with keywords. Instead, the metadata should help viewers understand the content and decide whether the video is relevant to them.
A useful generation prompt might ask the model to:
- Create a concise title that accurately represents the main subject.
- Write a clear description explaining what viewers will learn.
- Suggest a small set of relevant tags where they add value.
- Identify useful chapter ideas if timestamps can be verified.
- Avoid unsupported claims, fabricated links, misleading promises, and irrelevant keywords.
- Return the result in a predictable format that the program can validate.
For example, a tutorial about creating an automated uploader might receive a title such as “How to Automate YouTube Uploads with Python and AI.” The description could explain the workflow, mention the tools demonstrated, and link to genuine documentation used in the tutorial.
Generated metadata should be reviewed before publication. Confirm product names, links, technical instructions, and any claims about software features. Search optimization can improve discoverability, but it cannot guarantee a particular ranking or number of views.
Step 9: Organize Input and Output Folders
A dedicated folder structure makes a YouTube automation project easier to use. You could keep unfinished videos and thumbnails in an input directory, generated metadata in a separate output directory, and completed uploads in an archive. Keep credentials outside publicly shared project files.
Use clear filenames and define how the program should match each thumbnail to its corresponding video. File extensions, capitalization, and naming differences can cause matching errors. If a thumbnail is missing, the application should report the issue rather than silently assuming the wrong image belongs to the video.
After a successful upload, record the video ID, title, upload status, and any relevant error information. Move or archive the source file only when the upload has been verified. This helps prevent accidental duplicate uploads and makes failed jobs easier to retry.
Step 10: Upload Videos Through the YouTube Data API
The YouTube Data API provides supported methods for uploading videos and setting certain metadata fields. Your program should use the official API and the authorization flow configured for the project rather than attempting to imitate browser clicks or bypass account controls.
Before uploading, validate the file, confirm the intended channel, check the title and description, and review the audience and visibility settings. Use a resumable upload approach where supported by the chosen client library so that interrupted transfers can be handled more reliably.
Do not assume that an upload request means the video is immediately public. Processing, visibility restrictions, API permissions, and account-specific requirements can affect the result. Store the returned video identifier and verify the final status through the supported API or YouTube Studio.
Step 11: Handle Thumbnails and Publishing Settings
Thumbnail handling should be tested independently because a successful video upload does not guarantee that a custom thumbnail was applied. Confirm that the image file exists, uses a supported format, and meets YouTube’s current requirements. The API operation for setting a custom thumbnail may require separate permission or eligibility checks.
Likewise, configure audience declarations, altered or synthetic content disclosures where applicable, comments, and visibility according to the actual video and current YouTube rules. Do not automatically mark every video as suitable or unsuitable for children without assessing its intended audience. These settings should reflect the content, not simply a preference to increase engagement.
Common YouTube Automation Problems and Solutions
Even a well-designed automation program may encounter errors. A reliable workflow should report problems clearly and avoid publishing incomplete or incorrect information.
1. The Google API Request Fails
Check that the YouTube Data API is enabled in the correct Google Cloud project, the authorization belongs to the intended account, and the requested scopes permit the operation. Review the returned error message and current API documentation instead of repeatedly retrying the same failed request.
2. The Program Cannot Find a Video or Thumbnail
Confirm the configured folder paths, file extensions, and naming conventions. Test the input-folder logic with one video and one thumbnail before adding multiple files. A useful application should report missing files in understandable language.
3. The Transcript or Description Is Inaccurate
Review the transcript and check the AI instructions. Improve audio quality where possible, specify the intended audience, and instruct the model to use only information supported by the transcript. A human review is particularly important for tutorials containing technical or factual claims.
4. The Upload Stops Before Completion
Check your internet connection, file accessibility, API quota, authorization status, and the details returned by the upload library. Implement sensible retry handling and preserve upload progress where supported. Before retrying a job, determine whether the previous request already created a video to avoid duplicates.
5. The Custom Thumbnail Is Not Applied
Check the thumbnail path, supported image format, API response, permissions, and any relevant account eligibility requirements. Verify the video separately from the thumbnail operation. A clear error log can help you identify which stage failed.
Best Practices for Safe and Effective Automation
- Start small: Test with one short video before enabling batch uploads.
- Keep a review step: Approve the title, description, thumbnail, and visibility before publication.
- Use accurate metadata: Ensure every title and description represents the actual video.
- Respect copyright: Upload only content you own or have permission to use, including music, footage, images, and other creative assets.
- Protect privacy: Avoid sending confidential or personal information to external AI services without understanding their data-handling terms.
- Monitor API usage: Check current quotas, usage limits, and applicable costs for transcription and AI services.
- Maintain logs: Record upload results and actionable error messages without logging secret credentials.
- Keep dependencies updated: Review official documentation and update libraries carefully to avoid unexpected compatibility problems.
Does YouTube Automation Guarantee More Views?
No. Automation primarily reduces repetitive work and helps creators maintain a consistent publishing process. It does not guarantee higher rankings, more subscribers, or increased revenue. Video performance still depends on the value of the content, audience interest, presentation, viewer satisfaction, and other factors.
AI should support the creative process rather than replace editorial judgment. A useful tutorial, a clear explanation, and a relevant thumbnail are more valuable than publishing large quantities of poorly reviewed videos. Follow YouTube’s current policies and avoid misleading metadata, spam, or repetitive uploads that provide little value.
Frequently Asked Questions
Can beginners build an AI YouTube uploader?
Yes, beginners can use an AI coding assistant to plan and build a basic application. However, installing dependencies, configuring authorization, protecting credentials, and troubleshooting API errors still require care. Start with a small test project and learn what each permission does.
Can Claude upload videos directly to YouTube?
Claude can help you design and write an application that uploads videos through an authorized YouTube API connection. The actual upload is performed by the application and API integration, not by the language model alone. Available capabilities depend on the coding environment and permissions you configure.
Can titles and descriptions be generated automatically?
Yes. A program can send a transcript to an AI text-generation service and request a title, description, and suggested tags. The output should be checked for factual accuracy, relevance, readability, and compliance before publication.
Is the YouTube Data API free to use?
API access is governed by Google’s current quota and usage rules. You should review the official documentation for applicable quotas, upload requirements, and any restrictions. Separate transcription or AI services may have their own pricing and usage limits.
Can an automated uploader add custom thumbnails?
It can be designed to upload a custom thumbnail through a supported API operation when the account, permissions, image, and other requirements allow it. Thumbnail upload should be tested separately because it can fail even when the video upload succeeds.
Should every video be published automatically?
Not necessarily. For most new projects, a review-before-publishing workflow is safer. Once you have tested the system and understand its limitations, you can decide which steps are appropriate to automate while retaining control over important publishing decisions.
Conclusion
YouTube upload automation can make a creator’s workflow more efficient by connecting audio transcription, AI-generated metadata, file management, and authorized video uploading. Tools such as Claude, VS Code, Python, Google Cloud Console, and the YouTube Data API can form the foundation of a practical solution.
The best approach is to build the system in stages, protect your credentials, verify the selected channel, and test every important feature before relying on unattended uploads. Treat AI-generated titles and descriptions as drafts that need quality checks, and use accurate thumbnails and publishing settings.
When designed carefully, an automated workflow can reduce repetitive tasks and leave you with more time to create useful videos. The real goal is not simply to upload faster; it is to build a dependable process that supports consistent, original, and valuable content.